MySQL安装:MySQL 5.7
2014-10-14
1. 背景
正常情况下,不应写什么软件的安装步骤,只是 MySQL 5.7 相对与 MySQL 5.5 有很多变化,因此才整理了这篇 blog,方便自己记忆。
2. 阿里云下,安装 MySQL 服务器
自己主机的基本信息:
| 属性值 | 备注 |
|---|---|
| 操作系统 | CentOS release 6.5 (Final) |
正常情况下,安装 MySQL 服务器,直接执行 yum 命令即可:
yum install -y mysql-server mysql mysql-devel
但当前云 repo 有问题:
[root@guoning02-01 ~]# yum install -y mysql-server mysql mysql-devel

...

Error: Package: mysql-5.5.34-1.el6.remi.x86_64 (remi-mirror)
           Requires: real-mysql-libs(x86-64) = 5.5.34-1.el6.remi
           Available: mysql-libs-5.5.33-1.el6.remi.x86_64 (remi-mirror)
               real-mysql-libs(x86-64) = 5.5.33-1.el6.remi
           Available: mysql-libs-5.5.34-1.el6.remi.x86_64 (remi-mirror)
               real-mysql-libs(x86-64) = 5.5.34-1.el6.remi
Error: Package: mysql-server-5.5.34-1.el6.remi.x86_64 (remi-mirror)
           Requires: real-mysql-libs(x86-64) = 5.5.34-1.el6.remi
           Available: mysql-libs-5.5.33-1.el6.remi.x86_64 (remi-mirror)
               real-mysql-libs(x86-64) = 5.5.33-1.el6.remi
           Available: mysql-libs-5.5.34-1.el6.remi.x86_64 (remi-mirror)
               real-mysql-libs(x86-64) = 5.5.34-1.el6.remi
Error: Package: mysql-devel-5.5.34-1.el6.remi.x86_64 (remi-mirror)
           Requires: real-mysql-libs(x86-64) = 5.5.34-1.el6.remi
           Available: mysql-libs-5.5.33-1.el6.remi.x86_64 (remi-mirror)
               real-mysql-libs(x86-64) = 5.5.33-1.el6.remi
           Available: mysql-libs-5.5.34-1.el6.remi.x86_64 (remi-mirror)
               real-mysql-libs(x86-64) = 5.5.34-1.el6.remi
 You could try using --skip-broken to work around the problem
** Found 1 pre-existing rpmdb problem(s), 'yum check' output follows:
kernel-firmware-2.6.32-431.20.3.el6.mt20140703.x86_64 is a duplicate with kernel-firmware-2.6.32-431.5.1.el6.noarch
提示依赖的安装包有问题。因此,采用下一章节的方法来安装 MySQL。
3. CentOS 6.5 环境下,安装 MySQL 5.7
3.1. 添加Yum仓库
--------------- On RHEL/CentOS 6 ---------------
wget http://dev.mysql.com/get/mysql57-community-release-el6-7.noarch.rpm
# 如果是其他版本的CentOS,可以去MySQL官网找对应的仓库url

yum localinstall mysql57-community-release-el6-7.noarch.rpm

# 上面的两条命令添加了一个MySQL的Yum仓库到系统仓库列表里,并下载了GnuPG密钥校验包的完整性
3.2. 检查仓库是否添加成功
命令:
yum repolist enabled | grep "mysql.*-community.*"
3.3. 安装MySQL
安装 MySQL 的命令:
yum install mysql-community-server

# 上面的命令默认会安装最新版的MySQL,如果想安装其他版本的MySQL,可以配置一下MySQL Yum仓库的子仓库:
# yum-config-manager --disable mysql57-community
# yum-config-manager --enable mysql56-community
3.4. 启动,设置密码
查找 my.cnf 配置文件:
[root@guoning02-01 ~]# find / -name "my.cnf"
/etc/my.cnf
修改 my.cnf 文件:
[root@guoning02-01 ~]# vim /etc/my.cnf
...

[mysqld]
# 新增配置:
skip-grant-tables
启动 MySQL:
# 启动 MySQL
[root@guoning02-01 ~]# service mysqld restart
# 连接到 MySQL
[root@guoning02-01 ~]# mysql
mysql>
设置密码:
mysql> update mysql.user set authentication_string=PASSWORD('1234') where User='root';
mysql> flush privileges;
修改 MySQL 的启动配置,并重启 MySQL:
[root@guoning02-01 ~]# vim /etc/my.cnf
...

[mysqld]


# 去除配置:
# skip-grant-tables

# 新增配置:
validate_password=OFF

// 重启 MySQL
[root@guoning02-01 ~]# service mysqld restart
Stopping mysqld:                                           [  OK  ]
Starting mysqld:                                           [  OK  ]
重新连接 MySQL:
[root@guoning ~]# mysql -uroot -p
Enter password:
Type 'help;' or '\h' for help. Type '\c' to clear the current input statement.
mysql>
mysql> show databases;
ERROR 1820 (HY000): You must reset your password using ALTER USER statement before executing this statement.
mysql> SET PASSWORD = PASSWORD('rootROOT');
3.5. 允许远程访问
远程连接,出现异常:
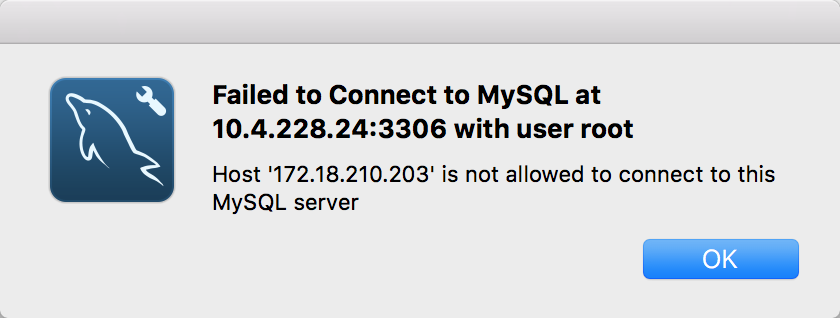
解决办法:
# 登陆 MySQL 服务器
[root@guoning ~]# mysql -uroot -p
Enter password:
Type 'help;' or '\h' for help. Type '\c' to clear the current input statement.
mysql>
mysql>
mysql>
mysql> use mysql
mysql>
mysql>
mysql> update user set host = '%' where user = 'root';
原文地址:https://ningg.top/mysql-installation-mysql-57/